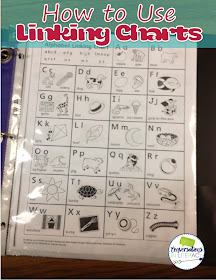
As some of us are heading back to school soon, I am beginning a new series of blog posts for guided reading! First up is using sound linking charts to help students learn and retain the correct sounds for letters and groups of letters.
I use linking charts all the time. This ABC linking chart is from When Readers Struggle. I have my kindergarten students read this chart every day at the beginning of school. I like this one because it teaches both sounds for the vowels.
We read it forwards and once we get good at that, we read it backwards or one row per student. I like to call out a sound and they find the letter and mark it with a pom pom. Or when we get really good at it, I ask them to find the letter 1 over from the Qq. That gets in two steps. I need them to know these sounds automatically. I like to keep this chart in our Readers Notebooks to refer to when reading or writing to make links between the letters/pictures/sounds.
My RTI students also need linking charts. Again, we read them in all kinds of ways- forwards, backwards, one row per student. Just takes a few minutes to do this quickly. If your students can handle it, adding fun pointers helps with engagement. If they cannot, fingers work fine!
On this long vowel silent e chart, buttons were used to mark chunks. You can use buttons, pom poms, beans, etc... I call out a word or even a chunk and students have to find the picture that goes with it. Find the picture that has the /ine/ chunk. They can find it and mark that space. Keep it quick and moving!
Another step in linking charts is to remove the picture clues. Call out the picture clue that used to be there or just call out a word that contains the chunk. Students find the chunk and then with dry erase markers they write the word right on the plastic sleeve in the box. You are trying to build automaticity and fluency with these targeted sounds.
I also have charts that have the pictures with the sound chunks removed. I can call out the picture, a chunk or to make it even higher learning if they are ready, I can call out a word that has the same chunk as one of the pictures. Then the students would write the word again in dry erase marker right in the boxes.
When you use linking charts, it is a good idea to have 3 sets of each one. The first one to start with would include the pictures and words/letters/chunks. The next one you could move to would be the exact same chart with words/letters/chunks removed leaving only the pictures as their link to what chunks or letters to use. Last, use the same chart, but with pictures removed. This way students are using the letter chunks to link to other words.
You can click the pictures to see linking charts. I did not include a photo of my Blends & Digraphs chart- click here. All of my charts are included in my intervention binders.
Don't forget to sign up for my newsletter!
Next week will be the next post in my guided reading series! Be sure to check back then!


I love your ideas for using those charts, Lori!
ReplyDeleteLooking forward to your next GR post.
Thank you, Barbara! Have a wonderful school year!
DeleteAwsome
ReplyDeleteThank you ahmad!
DeleteThank you Jen! Have a wonderful school year!
ReplyDeleteReading Recovery taught me the importance of those links so I use them, but you have taken it to another level. I'm loving these.
ReplyDelete